Building a deck is one of the most satisfying home improvement projects you can take on. A well-constructed deck adds usable outdoor space, increases your home’s value, and creates the perfect spot for relaxing or entertaining. Imagine weekend barbecues, morning coffee outdoors, or simply enjoying the sunset with family and friends—all on your new deck.
In this guide, we’ll break down the entire process in a simple, step-by-step format. Whether you’re new to DIY or already handy with tools, this guide will help you build a safe and beautiful deck from the ground up.
Step 1: Plan Your Deck
Define Your Purpose and Size
Start by thinking about how you’ll use the deck. Do you want space for outdoor dining, a cozy reading nook, or room to host large gatherings? Your deck’s purpose will guide its size and shape.
Measure your available outdoor area and sketch a rough layout. This doesn’t have to be perfect, but it will help you visualize the project.
Check Permits and Local Codes
Before you get too far, check your local building codes and permit requirements. Each town or city has its own rules about deck size, height, railing specifications, and more. Getting a permit not only keeps your deck legal—it ensures it’s safe.
Choose the Perfect Spot
Think about where the sun rises and sets, how much shade you want, and the deck’s proximity to doors. Many homeowners attach decks to their homes for convenience, but freestanding decks are also a great option.
Consider your landscape as well. A level area will make the building process easier, but sloped yards can also work with creative multi-level designs.
Step 2: Select Your Deck Materials
Decking Options
- Pressure-Treated Lumber: Budget-friendly and widely available, but it needs regular maintenance like sealing or staining.
- Cedar or Redwood: Naturally resistant to rot and pests. These woods look beautiful but are more expensive.
- Composite Decking: Made from recycled materials and plastic. It’s low-maintenance and won’t rot, but it’s pricier.
- PVC Decking: Fully synthetic, extremely durable, and easy to clean. One of the most expensive options.
Framing Materials
Pressure-treated lumber is the go-to for framing since it resists decay and insects.
Hardware and Fasteners
Always use galvanized or stainless-steel fasteners to prevent rust. For a sleek look, consider hidden fasteners with composite decking.
When selecting your materials, think about your climate. Humid or rainy areas may require more weather-resistant materials, while drier climates offer more flexibility.
Step 3: Prepare the Site
Mark Out the Deck
Use stakes and string to outline the deck’s perimeter. Double-check that everything is square using the 3-4-5 triangle rule.
Clean the Ground
Remove grass, rocks, and debris from the area. For ground-level decks, you can lay down a weed barrier and gravel to control growth.
Proper site preparation also includes grading the soil to ensure good drainage. Standing water can weaken your deck’s structure over time, so it’s important to slope the area slightly away from your home.
Step 4: Set Footings and Posts
Dig the Footings
Your local codes will tell you how deep to dig—usually below the frost line. The footings will keep your deck stable over time.
Pour the Concrete
Place concrete tubes into the holes and fill them with concrete. Set post anchors into the wet concrete.
Install Posts
Cut your pressure-treated posts to height and secure them to the anchors. Make sure each post is perfectly vertical.
It’s helpful to have an extra set of hands during this step to ensure the posts remain level and plumb while the concrete cures.
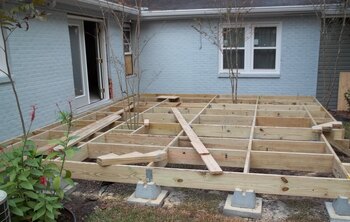
Step 5: Build the Frame
Attach the Beams
Beams sit on the posts and form the deck’s foundation. Use carriage bolts or post caps for secure attachment.
Secure the Ledger Board
For attached decks, the ledger board connects the deck to your home. Flashing above the ledger will protect it from water damage.
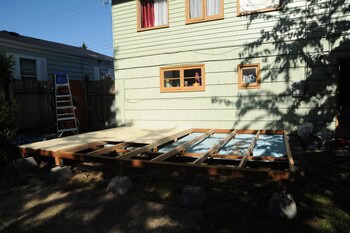
Install Joists
Lay out joists across the beams, spacing them according to your decking’s guidelines—typically 16 inches apart. Secure with joist hangers for extra strength.
Add Blocking
Blocking between joists keeps them from twisting and adds stability.
Taking the time to ensure the frame is level and well-secured will prevent future problems like sagging or shifting boards.
Step 6: Lay Decking Boards
Plan the Board Layout
Start at your home and work outward to keep everything straight. Use spacers to maintain even gaps between boards for drainage.
Fasten Decking
Use deck screws or hidden fasteners. Make sure each screw is flush with the board to prevent tripping.
Trim the Edges
Once all boards are down, trim the edges for a neat, professional finish.
Take breaks to step back and inspect your progress to ensure the layout remains visually aligned and even throughout the installation.
Step 7: Build Stairs and Railings
Measure and Cut Stringers
Stringers support the stairs. Measure carefully to meet building codes for stair height and depth.
Install Treads and Risers
Treads are the flat parts of the stairs, and risers are the vertical pieces. Secure both with the proper fasteners.
Add Railings
Railings aren’t just for looks—they’re required for decks above a certain height. Choose from wood, metal, or composite to match your deck’s style. Secure balusters evenly, and follow code for proper height and spacing.
Double-check railing heights and spacing to meet safety requirements and to ensure a sturdy, durable final product.
Step 8: Final Touches
Sand and Seal (For Wood Decks)
Sand down any rough spots, then apply a weather-resistant sealer or stain. This helps protect your deck from moisture and UV damage.
Clean Up
Dispose of leftover materials and check all fasteners and structural pieces one more time for safety.
Add Personal Touches
Consider built-in benches, flower boxes, a pergola for shade, or string lights to make your deck feel like an extension of your home.
You can also incorporate outdoor rugs, potted plants, or a small outdoor kitchen to make the space even more inviting and functional.
Deck Material Checklist
- Pressure-treated lumber (posts, beams, joists)
- Decking boards (pressure-treated, composite, PVC, or hardwood)
- Ledger board (if attaching to your home)
- Joist hangers
- Galvanized or stainless-steel screws and nails
- Concrete mix and footings
- Post anchors
- Stair stringers (pre-cut or custom)
- Stair treads and risers
- Railing materials (wood, metal, or composite)
- Flashing for the ledger board
- Gravel for drainage
- Deck sealant, paint, or stain
- Deck lighting, benches, or accessories
Tools List
- Circular saw
- Power drill
- Measuring tape
- Speed square
- Post hole digger or auger
- Level
- Hammer
- Safety equipment (gloves, goggles, dust mask)
- Paintbrush or sprayer for sealant
Sample Deck Project Timeline
Day 1-2: Planning and Shopping
- Finalize your deck design
- Get permits
- Purchase all materials and tools
Day 3-4: Preparing the Site
- Clear the work area
- Mark the deck outline
Day 5-6: Setting Footings and Posts
- Dig holes and pour concrete
- Install post anchors and posts
Day 7-8: Framing
- Attach beams and ledger board
- Install joists and blocking
Day 9-10: Laying Deck Boards
- Fasten decking boards
- Trim the edges
Day 11: Stairs and Railings
- Build stairs and railings to code
Day 12: Finishing Up
- Sand and seal (if using wood)
- Add accessories and clean the site
Day 13: Final Inspection
- Double-check all fasteners
- Inspect for safety and stability
Building a deck may stretch over several weekends if you’re balancing it with work and family time. Be patient and give yourself the flexibility to adjust the schedule if needed.
Sample Budget Template for Building a Deck
| Item | Estimated Cost (USD) |
| Pressure-treated lumber | $500 – $1,500 |
| Decking boards | $1,000 – $4,000 |
| Joist hangers and hardware | $200 – $400 |
| Concrete and footings | $150 – $300 |
| Railings | $500 – $1,500 |
| Stairs | $300 – $800 |
| Sealant, paint, or stain | $100 – $300 |
| Deck lighting and benches | $200 – $1,000 |
| Tools (purchase/rent) | $200 – $500 |
| Permits and inspections | $100 – $300 |
| Total Estimated Budget | $3,250 – $10,600 |
Note: Costs will vary depending on your location, deck size, and material choices.
Money-Saving Tips
- Shop around for the best material prices.
- Check for seasonal sales at home improvement stores.
- Consider renting power tools instead of buying.
- Always budget an extra 10-15% for unexpected costs.
- Reuse leftover lumber or fasteners from previous projects when possible.
Planning your purchases carefully can help you avoid overbuying, and sometimes local lumber yards offer discounts for bulk purchases.
Safety First: Key Precautions
- Always wear gloves, safety goggles, ear protection, and a dust mask.
- Use steel-toed, non-slip boots to protect your feet.
- Keep your workspace organized to avoid tripping hazards.
- Use a stable surface when cutting materials.
- Use GFCI outlets when working outdoors with power tools.
- Have someone nearby when lifting heavy materials.
- Use ladders carefully and consider fall protection for higher decks.
- Inspect power tools regularly and keep blades sharp.
- Always read tool safety manuals before starting.
- Never rush through tasks—working steadily and safely is the best way to avoid accidents.
Maintenance Tips for a Long-Lasting Deck
- Sweep regularly to prevent debris buildup.
- For wood decks, pressure wash and reseal every 1-3 years.
- Inspect annually for loose boards, rusted fasteners, or signs of rot.
- Use plastic shovels and pet-safe ice melt in winter to prevent surface damage.
- Keep nearby plants trimmed to allow airflow around the deck, which helps prevent mildew and moisture damage.
Taking care of your deck regularly will keep it looking great and structurally sound for many years.
Common Deck Building Mistakes to Avoid
- Skipping the planning phase can lead to design and safety issues.
- Ignoring local building codes may cause expensive legal problems.
- Using incorrect fasteners can weaken the deck structure.
- Forgetting proper drainage can cause water damage.
- Failing to seal wood decks makes them prone to moisture and UV damage.
- Neglecting to account for wood expansion and contraction can lead to warping or buckling.
Avoiding these common mistakes will help you build a safer, longer-lasting deck with fewer repairs down the road.
Final Thoughts
Building your own deck is a big project, but with good planning and careful steps, it’s absolutely doable. Not only will you save money, but you’ll also gain a valuable skill and the satisfaction of enjoying something you built with your own hands.
Remember, always double-check your measurements, follow safety guidelines, and don’t hesitate to ask Micton Home Renovations by calling on 226-600-5925 for advice if you’re unsure.
In the end, you’ll have a beautiful, sturdy deck to enjoy for years to come—a perfect place to relax, entertain, and make lasting memories.